Samba over SSH -- Opening Windows to UNIX safely and reliably
Introduction
Samba is a suite of programs that enables interoperability between Linux/Unix servers and Windows clients. See What Is Samba? for more. [1]. I use it to map some UNIX directories in a server at my workplace to several of my Windows desktops. Recently I had to put my server behind a firewall and close all the ports of communication except SSH (22). Now, Samba or any other windows NetBIOS communication (in plain language things like 'sharing' files and folders between windows computers.) needs port 139 to be open. My solution was to tunnel NetBIOS (port 139) communication over SSH. This has added advantage of the entire communication between UNIX server and windows client being encrypted.
The Tools
There are many ways of doing this. A google serch will point to some very informative pages on doing this based on PuTTY, a SSH client for windows. In my case, I wanted to do this with Cygwin (see also: this.) a UNIX/X11 system running in windows. The simple reason was in all computers I use I have a Cygwin installation. (See this link to find why). So the following is an account of doing this with Cygwin tools.
Windows Network configuration
First, some changes to the windows network configuration are needed. The reason is this (feel free to skip): We are going to 'map' port 139 of our server to the port 139 of the windows machine. Now any windows machine uses its port 139 for variety of NetBIOS services. If we hijack the port, these services (like drive mappings) will be interrupted. But, the good news is same port can exist (and communicate) more than once in the same computer if we have more than one network interface in that computer. Imagiene two interfaces I1 and I2, then its something like I1:139, I2:139. Now, we are not going to install another network interface here! But rather, the solution is to create a 'virtual' network interface (called Loopback Interface) just for the purpose of our port mapping. In windows we can create any number of these without any restriction from how many hardware network cards we have. Enough details.
(This is how I do this in my Windows 2000 computer, things like menu names may be slightly different in other systems like Windows XP, NT and I have no clue about Vista! Windows XP users might want to have a look at this article before proceeding.)
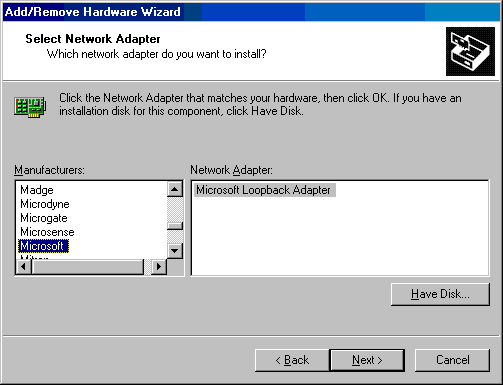
- Open Windows Control Panel (Start->Settings->Control Panel) and select Add/Remove Hardware. Select Add/Troubleshoot a device->Add a new device->No, I want to select the hardware from a list. Then in the Hardware type choice, select Network adapters. Windows will take a minute to go to the next dialog -- Select network adapter. Select Microsoft as manufacturer and Microsoft Loopback Adapter as Network adapter. (See the figure on right.) Let windows install it by clicking Next. Some people claim they had to restart windows here; I did not. But there's no harm doing so.
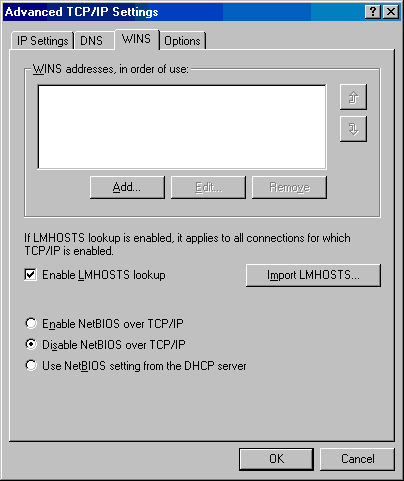
- Now from the control panel, open Network and Dial-up Connections. The new loopback adapter will appear below your original network connection (Look for Microsoft Loopback Adapter under Device Name). Assign IP address 10.0.0.1 to this device and fill in subnet mask, default gateway and DNS server the same as the original network card's. (If you use DHCP (automatic) for the original connection, use the command ipconfig in command prompt to find these settings.) Finally, under Advanced TCP/IP settings (Advanced button) Check Enable LMHOSTS lookup and Disable NetBIOS over TCP/IP (see figure.)
Now you have completed the Windows part of setup.
Using Cygwin for tunneling
Open a Cygwin terminal and issue the following command.
ssh -L 10.0.0.1:139:localhost:139 <username>@<unix.computer.net>
where <username> and <unix.computer.net> need to be replaced with real username and UNIX machine name (or ip address). After prompting for your UNIX password, the system will let you login. At this stage, the port 139 of your unix server is tunneled over SSH to the port 139 of loopback adapter of your windows machine.
The following command should ask for the Samba password and open the Samba shares.
- Start->Run->\\10.0.0.1
Automating the tunnel
It now necessary useful to make your tunnel process automatic, background process (a windows service) for practical convenience.
- Step one
- First make sure that your UNIX machine does not ask for a password to login from the Cygwin installation in your windows machine. To do this follow this article: SSH login without passwords.
- Step two
- Create a bash script file named tunnel_samba.bash and save it in a directory /.bin. and make sure it is executable (chmod u+x /.bin/tunnel-samba.bash).
#!/bin/bash
#make sure no password is needed. 10.0.0.1 is loopback interface with
#Enable LMHosts Lookup and Disable NetBIOS over TCP/IP
ssh  -N -L 10.0.0.1:139:localhost:139 <username>@<unix.computer.net>
- Step three
- Issue the following command in Cygwin to install tunnel_samba.bash as a service.
  cygrunsrv -I samba_tunnel -p /.bin/tunnel-samba.bash \
    -f "SSH tunnel for SAMBA shares" -u <windows user name>
<windows user name> should have Administrative privileges in windows. You will be asked to enter the password two times.
Now, when you open the services table (Control Panel->Administrative Tools->Services), there should be a service named samba_tunnel. Make sure that the service starts automatically with windows. Optionally you may change the failure recovery criteria for the service.
Now, reboot the machine and check whether everything works as expected. Without doing anything else, you should be able to open your samba shares by the command:
- Start->Run->\\10.0.0.1
Troubleshooting
If there are problems starting the service (e.g. service terminating as soon as it starts), have a look at cygwin's log files. In the folder /var/log there should be a log file named samba_tunnel.log.
Remember the following points:
- Path after -p option should be a valid, absolute cygwin path.
- Make sure that you specify correct windows username/password of a user that have administrative privileges and also complete access to the cygwin system.


